I have been trying my hand at angular 2 applications as part of my learning and thought of sharing my thoughts on my initial experience.
When I think of an angular app the first thing that comes to my mind is the structure and organization it imposes implicitly. As you all know, as programmers we don’t always write structured code, however angular is inherently structured, meaning it has been designed in such a way that it enforces the structure. This is seen in the fact that every angular app is made of up of what we can call building blocks. These building blocks individually have their own purpose and together they represent the app. It is this separation of concerns into separate parts that enforces the organization.
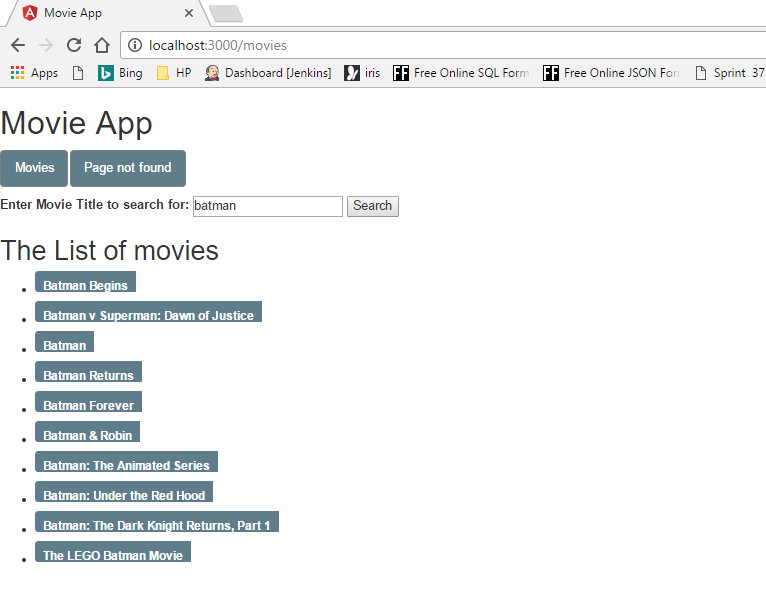
I decided to create a simple movie app just to get an idea of how these building blocks work together. I’ll be sharing what i’ve learnt taking this sample app as an example. I’ve also mentioned a few primary differences between angular and knockout.
What is Angular JS?
AngularJS is a JavaScript-based open-source front-end web application framework mainly maintained by Google and by a community of individuals and corporations to address many of the challenges encountered in developing single-page applications. (wiki)
Angular applications only require HTML, CSS and typescript(a superset of javascript). It is based on the MVC pattern and hence is structured, easily testable and maintainable front-end applications.
App Structure:
All angular apps are modular and angular has its own modularity system called Angular modules or NgModules. Every angular app has at least one module called the root module, conventionally called ‘appmodule’. A module will consist of components, services and other modules. For the app to run all these dependent modules and components must be loaded, this is handled by something called dependency injection. Dependency injection is a mechanism in which all the necessary dependencies are loaded (injected) into a module or component. This dependency injection is triggered whenever a component or a module is initialized.
An angular app is initialized by bootstrapping the root module. In a high level sense Bootstrapping means to include the necessary resources required by the app. When an app is bootstrapped, the angular compiler traverses the DOM and initializes instances of components wherever it is required. As each component or module is initialized, angular’s dependency injection will inject the necessary resources into each component or module.
In general, there are 4 key elements in an angular app, which are
Components – can also be called a view component, this basically represents a particular portion or view of the app.
Services – handles all business level logic and provides necessary data
Routers – handles navigation across different views
Directives – used to add behavior to existing DOM elements.
These key elements are the building blocks of an angular application. The example movie app which i have made is a simple app which has one movies-list component, a service to provide data and a simple routing Module.
Components
In Angular 2, “everything is a component” Components are the main way we build and specify elements and logic on the page. Lets consider a page of a movie app for example, this page might consist of a navigation bar and a list of movies. Here, the navigation bar will be one component and the list of movies will be another component.
A component encapsulates the template (HTML markup), data and the behavior of the view. Every angular app will have root component and it will consist of hundreds of other components and Some of these components are composed of other components.
In terms of code, a component is a simple typescript class which consists of properties which encapsulated the behavior of the view. For the movie app I’ve created a component to display the list of movies called movie-list-component.
import {Component} from '@angular/core';
import {MovieService} from './movie.service'

@Component({
selector:'<movie-list></movie-list>',
template:`<div class="movie-list-container">
		<label> Enter Movie Title to search for:</label>
		<input (keyup)="searchTitle=$event.target.value">
		<button(click)="searchMovie()">Search</button>
		<h2></h2>
		<ul class="movies">
		<li *ngFor="let movie of movies">
		<span class="badge"> </span>
		</li>

		</ul>
		</div>`,
providers:[MovieService],
styles:[` .movies .badge {

			display: inline-block;

			font-size: small;

			color: white;

			padding: 0.8em 0.7em 0 0.7em;

			background-color: #607D8B;

			line-height: 1em;

			position: relative;

			left: -1px;

			top: -4px;

			height: 1.8em;

			margin-right: .8em;

			border-radius: 4px 0 0 4px;

			 margin-bottom:10px;

			 }

		.movie-list-container{

		  margin-top:10px;

	}

`]

})

export class MoviesListComponent{

  title:string=`The List of movies`

  movies:any;

  searchTitle:any;

}
As you can see in the code, the ‘MovieListComponent’ is preceded by the export keyword. In angular 2, in every module we usually export one or more classes, by exporting we specify that the class can be imported by other modules. So here we export our ‘MovieListComponent’, this means that any other component can use this component by importing it.
As you can see in the code, the component consists of a simple class ‘MovieListComponent’ which has three properties namely ‘movies’,’title’ and ‘searchTitle’.
Notice how the class is decorated with ‘Component’ decorator.The decorator ‘Component’ is similar to an attribute in c#, it is the metadata that tells c# that this class is a component. The Component decorator is defined in the angular 2 core module, therefore we need to import this in our component, this is what the import statement in the first line does.
The decorator here has three attributes specified - template, selector and styles.
Selector: The selector is the CSS selector for the host html element. So when angular sees an element that matches this CSS selector it will create an instance of the component within the element.
Template: The template is the html markup for the component. This is the html that is rendered in the DOM when the component is instantiated.
Styles: The styles attribute is used to define the CSS styles used in the template.
The template consists of a header element, whose content is specified through interpolation . You use interpolation to weave calculated strings into the text between HTML element tags and within attribute assignments. The text between the braces is the name of a component property. Angular replaces that name with the string value of the corresponding component property.
The header element is followed by a an input element with a search button.
Notice the bindings
-
(input)="searchTitle=$event.target.value"in the input element -
(click)="searchMovie()"in the button
These are examples of data-bindings (event bindings) which will be explained below.
This is followed by a simple unordered list <ul>.
The <li> element has an ‘ngFor’ directive. This attribute specifies that the corresponding element <li> must be repeated for every movie in the
‘movies’ property.
Data binding:
One of the most important things to remember about components is that it is decoupled from the DOM. The interaction between the component and the DOM is enabled by data-binding.
In the example above, the interpolations {title},
{movie.title} are examples of data binding. The properties title and movies are
bound to the view, so when the properties change (i.e., if a new movie
is added to ‘movies’ or the ‘title’ is changed), the view is
automatically updated. This is an example of one-way data binding. There
is also two-way data binding, which is usually used in forms.
All bindings will have a source and a target, therefore bindings in general can be categorized based on the data flow as follows:
-
Source-to-view
-
View-to-source
-
View-to-source-to-view
Source-to-view:
In the movie app, the interpolations {title}, {movie.title},
{movie.id} are examples of source-to-view binding. Here the ‘title’,
‘movie.title’ and ‘movie.id’ are properties of the component (which is
the data source for the view) and they are bound to the view. Any
changes to these properties will be tracked by angular and the view is
updated automatically.
The target of this type of binding Is usually an element or component or directive property.
For example,
<input [value]=”movie.title”/>
Here the target is the value property of the input element, which is assigned the value of ‘movie.title’.
View-to-source:
This type of binding usually relates to user interactions with the UI such as entering text into an input box, clicking a button etc. This type of binding is usually an event binding where the target is an event.
Example: <input (input)=”movie.title=$event.target.value”/>
Here the event binding listens to the input event, as the user enters text, the value of the input event which is obtained from $event.target.value is assigned to the component property ‘movie.title’.
View-to-source-to-view:
Two-way bindings are usually used in forms. A two-way binding is a combination of an event binding and a property binding. For example, suppose we had a form to edit a movie, we would declare an input element which is initially set with the current movie title, the value of the input element can be set by binding its value property with the property movie.title. We should also listen to user input events to update the property. Therefore, we require two bindings as shown.
<input [value]=”movie.title”
(input)=”movie.title=$event.target.value”/>
This is an example of two-way data-binding.
Angular provides the ‘ngmodel’ directive to implement two-way data binding in forms. Therefore, the above binding is written as shown:
<input [(ngmodel)]=”movie.title”/>
Angular automatically tracks changes to the property as well as listens to input events and updates the corresponding targets.
Service:
A service in angular is the module which provides the data required by the view to the component. In general, any logic that is not related to the view such as business rules of your application is handled by the service.
In the movie app I have add a service called ‘movieService’. This service will fetch the movies by consuming an API.
import {Injectable} from '@angular/core'
import{ Http,Response,Headers,RequestOptions ,URLSearchParams}  from '@angular/http';
import { Observable } from 'rxjs/Observable';
import 'rxjs/add/operator/catch';
import 'rxjs/add/operator/map';
import {Movie} from './movie'

@Injectable()

export class MovieService{

   private getMoviesListUrl="http://www.omdbapi.com/?";

   constructor(private http: Http) { }

   mapMovies(response:Response): Movie[]{

   var x= response.json();

   return x.Search.map(toMovie);

}

mapMovie(response:Response):Movie{

 var x= response.json();

 return <Movie>{

   title:x.Title,

   year:x.Year

 };

}

getMovies(searchTitle:string){

    let params: URLSearchParams = new URLSearchParams();

	params.set('s', searchTitle);

	var movies= this.http.get(this.getMoviesListUrl,{search:params})

            .map(this.mapMovies);

            return movies;

}

private handleError(error: any): Promise<any> {
console.error('An error occurred', error); // for demo purposes only

   return Promise.reject(error.message || error);

  }

}

function toMovie(r:any): Movie{

 let movie = <Movie>({

   title: r.Title,

   year: r.Year,

 });

 console.log('Parsed movie:', movie);

 return movie;

}
In this service we’ll be making an http call to an API endpoint , for this we will need the HttpModule defined in the angular 2 core module, so we import it in our component.
I have exported the ‘MovieService’ class so that it can be imported by other components for example our movie-list-component.
The Service has a property ‘getMoviesUrl’, which is basically the URL of the api which will provide the service. The class has a constructor to which we pass a parameter ‘http’ which is of type Http.
Angular uses the concept of dependency injection to load all dependencies in the app. Therefore, when the app is loaded, angular looks at the constructor and sees that our service is dependent on the HttpModule and therefore it injects it into our service.
The service has a method called ‘getMovies’ which makes the http call to the API. The http.get() method always returns an Observable. An observable is a sequence of items that arrive asynchronously over time. In case of our http.get() call, the observable is a single item which is the http response object. The observable that is returned must be in a format so that it can be used by our application, so we map the returned observable (i.e., response) to JSON.
Now our service has made the http call and fetched the data which is ready to be provided, however the data is provided only to the components who have subscribed to the observable. So, in our movie-list-component, we must subscribe to the observable returned by the service. This is done as follows
import {Component} from '@angular/core'
import {MovieService} from './movie.service'

@Component({

selector:`<movie-list></movie-list>`,
template:`

<div class='movie-list-container'>
<label > Enter Movie Title to search for:</label>
<input (input)="searchTitle=$event.target.value"> <button
(click)="searchMovies()">Search</button>

   <h2></h2>

   <ul class="movies">

       <li \*ngFor="let movie of movies">

	<span class="badge"> </span>

   </li>

   </ul>

   </div>`,

   providers:[MovieService],

   styles:[` .movies .badge {

					     display: inline-block;

					     font-size: small;

					     color: white;

					     padding: 0.8em 0.7em 0 0.7em;

					     background-color: \#607D8B;

					     line-height: 1em;

					     position: relative;

					     left: -1px;

					     top: -4px;

					     height: 1.8em;

					     margin-right: .8em;

					     border-radius: 4px 0 0 4px;

					     margin-bottom:10px;

   					}

   .movie-list-container{

     margin-top:10px;

   }

`]

})

export class MoviesListComponent{

  title:string=`The List of movies`

  movies:any;

  searchTitle:string;

constructor(private movieService:MovieService){

}
searchMovies(){

this.movieService.getMovies(this.searchTitle).subscribe(movies=>this.movies=movies);


			}

	}
First we import the ‘MovieService’ in our component, this is done by the import statement. In our component, we have defined a constructor which takes a parameter ‘MovieService’, therefore, when our component is instantiated, angular’s dependency injection will inject the ‘MovieService’ into our component.
The searchMovies() method is called when the user clicks the search button. In this method we subscribe to the observable returned by the getMovies() method of the ‘MovieService’. The getmovies method is called with the parameter ‘seachMovieTitle’. The returned data is assigned to the component property ‘movies’.
Another important thing to consider is the attribute ‘providers’ added in the component decorator. This is needed because angular does not know who or what is providing data used by the component. The ‘providers’ attribute is used to specify this.
Routers
One of the most important concept which is crucial to single page applications is navigation between views.
Routers in angular 2 are purely used for navigation. It can interpret a browser URL as an instruction to navigate to a client-generated view. It can pass optional parameters along to the supporting view component that help it decide what specific content to present. The router logs activity in the browser’s history journal so the back and forward buttons work as well.
To use routing, first and foremost we need to configure the routes. I have configured the routes in a separate module in a file called the app-routing-module.
import { NgModule }              from '@angular/core';
import { RouterModule, Routes }  from '@angular/router';
import { PageNotFoundComponent } from './not-found.component';
import {MoviesListComponent}  from './movies-list.component'

const appRoutes: Routes = [

 {path: 'movies', component: MoviesListComponent },

 { path: '',   redirectTo: '/movies', pathMatch: 'full' },

 { path: '**', component: PageNotFoundComponent }

 ];

@NgModule({

 imports: [

   RouterModule.forRoot(appRoutes)

 ],

 exports: [

   RouterModule

 ]

})

export class AppRoutingModule {}
Routing in angular 2 is provided by the RouterModule. Therefore, we import the RouterModule into the file.
Here the routes are defined in Routes array. Each Route maps a URL path to a component. The array of routes is configured via the RouterModule.forRoot() method.
The first path defines that whenever the URL path has /movies, it should redirect to the /movies and hence will display the ‘MovieListComponent’
The empty path in the route represents the default path for the application, the place to go when the path in the URL is empty, as it typically is at the start. This default route redirects to the route for the /movies URL and, therefore, will display the ‘MovieListComponent’.
The ** path in the last route is a wildcard. The router will select this route if the requested URL doesn’t match any paths for routes defined earlier in the configuration. This is useful for displaying a “404 - Not Found” page or redirecting to another route.
The routing mechanism has two key elements, which are
RouterOutlet: The directive (
RouterLink: The directive for binding a clickable HTML element to a route. Clicking an element with a routerLink directive that is bound to a string or a link parameters array triggers a navigation.
For example, to implement routing in our application, we can define our ‘AppComponent’ as follows:
import {Component} from '@angular/core';
@Component({
    selector: `my-app`,
    template:`<h1>Movie App</h1> template: `<h1>Movie App</h1>
			  <ul class="nav nav-pills nav-justified">
			  	<li class="nav-item">
					 <a class="nav-link" routerLink="/movies" > Movies</a>
   			    </li>
				<li class="nav-item">
					<a class="nav-link  " href="\#/foo">page not found</a>
				</li>
			  </ul>
			  <router-outlet></router-outlet>`,
			  })
export class AppComponent { }
Here we have two list elements which have the routerlink directives, one
with the path /movies and the other with /foo. These will be rendered as
clickable tabs. Suppose our app is hosted on the port 3447, so the
browser URL with an empty path will look like, for eg. localhost:3447,
this represents an empty path and hence according to our configured
routes it will match the empty path route and hence will be redirected
to /movies. Therefore, the ‘MovieListComponent’ view will be displayed
in
If the URL was say for example, localhost:3447/movies, this will match
the first route and hence the ‘MovieListComponent’ view will be
displayed in
Directives:
Directives in angular are similar to components in that it is used to update the DOM(or the view). However, unlike components they do not have a template or html markup. They are solely used to add behavior to the existing DOM elements.
At a high level, directives are markers on a DOM element (such as an attribute, element name, comment or CSS class) that tell Angular to attach a specified behavior to that DOM element (e.g. via event listeners), or even to transform the DOM element and its children.
Directives are of three types:
Component directives: These are directives with a template. By default, all components are directives. For example, ‘MovieListComponent’ is a directive.
Structural directives: These change the structure of the view. For example, the ngFor directive used in the ‘MovieListComponent’ is a structural directive.
Attribute directives: These are used as attributes of elements. They are used to define the behavior of the view. For example, ngClass directive which is used to specify the class which is applied to the element.
When AngularJS bootstraps your application, the HTML compiler traverses the DOM matching directives against the DOM elements.
How it all works?
So far we’ve looked at the basic elements of an angular JS application. But how do all these interact to complete our application.
Like all angular apps we’ll have a basic html file which is the starting point of our application.
	<html>

	  <head>

	    <title>Movie App</title>

	    <base href="/">

	    <meta charset="UTF-8">

	    <meta

	    <script>

	System.import('main.js').catch(function(err){ console.error(err); });

	</script>

	</head>

	<base href="/">

	 <body>

	    <my-app>Loading AppComponent content here ...</my-app>

	  </body>

	</html>
The html has a custom directive
First and foremost, for the app to work we must bootstrap the root component. Bootstrapping is basically the initialization process which starts the app. In our example, the root component is the ‘AppComponent’. As I said before, every angular app will have a root module which is the ‘AppModule’ as shown below:
	import { NgModule }      from '@angular/core';
	import { BrowserModule } from '@angular/platform-browser';
	import { HttpModule } from '@angular/http';
	import { AppComponent }  from './app.component';
	import {MoviesListComponent} from './movies-list.component';
	import {PageNotFoundComponent} from './not-found.component';

	  @NgModule({

	  imports:      [ BrowserModule,HttpModule],

	  declarations: [ AppComponent ,MovieListComponent,PageNotFoundComponent],

	bootstrap:    [ AppComponent ]

	})

	export class AppModule { }
We must import all the necessary modules and components required by our app in this module. As you can see, the app module has a number of imports which include the components ‘AppComponent’ (which is our root component), the ‘MovieListComponent’ and the ‘PageNotFoundComponent’.
The application module is defined by the @NgModule directive. The @NgModule decorator has three properties:
-
Imports – Which is used to import other modules into this module.
-
Declarations - Register components within this module.
-
Bootstrap – tells the module which component to bootstrap
So now that we have defined our root module, we must bootstrap the module to initialize our app. Conventionally the bootstrapping code is written in a file called ‘main.ts’
	import { platformBrowserDynamic } from '@angular/platform-browser-dynamic';

	import { AppModule } from './app/app.module';

	platformBrowserDynamic().bootstrapModule(AppModule);
In this file we also import platformBrowserdynamic module, this is used for bootstrapping angular apps in the browser (i.e., client side bootstrapping. Angular apps can also be bootstrapped from the server side). Finally we call the method platformBrowserDynamic().bootstrapModule(AppModule) to bootstrap the application.
When you bootstrap the app component, you basically compile the element into an executable, bidirectional bound application. By compile I mean the elements in the DOM are traversed looking for directives. When a directive is found the corresponding template is rendered. In our example, a brief overview of steps that occur are as follows:
-
The compiler traverses the DOM and as soon as it finds the *
* directive, it sees that it matches the selector ‘my-app’ defined in the ‘AppComponent’ and hence the ‘AppComponent’ is instantiated and its template is rendered into it. -
In our ‘AppComponent’, we have two links or tabs which are links to two different views, by default the URL path is empty and hence it redirects to /movies, which is the ‘MovieListComponent’.
-
The ‘MovieListComponent’ has a template which is rendered into the
directive. -
The constructor of the ‘MovieListComponent’ is called first which has the movie service parameter and hence the ‘MovieService’ is injected into the component. This means that the ‘MovieService’ class is instantiated and the instance is assigned to the ‘MovieListComponent’s ‘ ‘movieService’ parameter.
-
When the user triggers the search by entering the title and clicking the button, the searchMovie() method is called, which in turn subscribes to the getMovie() method of the movieservice to fetch the data.
-
When the data arrives on completion of the http call, the ‘movies’ property is assigned the list of movies, since the ‘movies’ property is bound to the
<li>element using the ngFor directive, the<li>element is repeated for each movie in ‘movies’. The page rendered will be as corresponding componentis instantiated.
Movie App Example :
You can download this sample project at : https://github.com/Jinu1994/Angular-Sample-Apps.git
Comparison with knockout:
Knockout is another JavaScript library for building web applications. Similar to angular, knockout also uses the concept of connecting different parts of the UI to the business logic through the use of declarative bindings. However, there are quite a few differences between angular and knockout.
- The most fundamental difference is that unlike knockout which is another JavaScript library, angular is a framework. Therefore, angular manages the whole application and defines the rules or guidelines to structure the application. In contrast, while programming in knockout the structure of the application is entirely up to you.
- Angular supports modularity. Angular builds up the application by adding modules, which have dependencies on other modules and so on. Each module can implement Angular features such as Controllers, Directives and Filters. This results in manageable code. Whereas in knockout, there is no such modularity imposed, it is entirely up to the programmer on how he writes his code. This sometimes results in the code becoming unmanageable.
- Another advantage of angular code is inherently testable. As I said before, a component in angular is decoupled from the DOM and the interactions are handled by data-binding. This decoupling means that the component can be easily unit tested. This is not easy in knockout as knockout code is not inherently testable.
- Another factor which makes angular a better solution in building single page applications is its Routing mechanism. Angular provides the RouterModule which allows management of application states (this means that when you navigate to a view, it is recorded in the browser’s history) and back/forward browser history navigation. Knockout does not provide routing.
- In angular there is no need to write observable functions. Angular traverses through the DOM and builds bindings based on defined directives. Therefore, the code is cleaner, easier to understand and less error prone.
SUMMARY
So to recap on what we’ve gone through, an angular app is defined by four key elements or building blocks. Consider your app consisting of different sections or pages, then each section is represented by a component which defines the template for the view and also binds the data to that section of the view. Then you have a service which provides the data and handles all back-end logic. Navigations between the pages is handled by the router. And finally, you have directives which are used to describe the appearance and structure of elements. In general, there is separation of concern of the application into these building blocks. This inherent structure and separation of concern is the primary difference between angular and knockout.
The above concepts used in Angular 2 contribute to it being a cross-platform framework. Learn one way to build applications with Angular and reuse your code and abilities to build apps for any deployment target such web, mobile web, native mobile and native desktop. Many of the concepts were made by considered the best practices for the future. Therefore it is one of the leading frameworks for building mobile and web applications.
References