I’ve recently been working on a new project, which involved creating a new web app that included a conversational interface. We decided to build the interface using Microsoft’s bot framework SDK. In this blog I’ll be discussing the basic concepts involved in this framework and how we can integrate it into any web application.
The core use-cases for the conversational interface included the following:
- Basic conversation capability to gather input from the user
- Some form of NLP processing to interpret the user’s request
- Easy integration into a web app channel
- Support for speech input
We looked at a number of bot frameworks, and the most apt one in accordance to our use cases was Microsoft’s bot framework SDK. It is an open source SDK and was flexible enough to be customized according to our needs.
So I’ll briefly go through the concepts involved in creating a bot using this framework. I’ll take the example of a user signing in and providing his business info as an example as I go through it.
Terminologies and concepts
Activity
An activity is any interaction between the user and the bot. Some of the most common activities include :
-
Message - sent from the client channel to the bot or vice versa. Any conversation would involve message activities being exchanged by the client channel and the bot.
-
ConversationUpdate - This is an activity that is sent to the bot , whenever a new party joins the conversation
-
Event - This is an asynchronous external trigger. This mostly used to trigger an action either by the bot or the client. For example : A web chat channel can request the bot to greet the user by sending an event activity ‘welcome’, on receiving it the bot would start a conversation by greeting the user.
Dialog
Dialogs are the central concept in a bot. A dialog basically processes inbound activities and generates outbound responses. The main bot application logic is composed in dialogs. A bot conversation is usually composed of multiple dialogs.
For example: In our example of a user signup: The conversation would have a SignUpDialog Dialog at the top which is composed of two sub-dialogs, one for gathering user info ,say UserProfileDialog, and one for gathering business info , say BusinessInfoDialog.
State data
As I mentioned a conversation involves invoking multiple dialogs and each dialog is assigned the responsibility of gathering specific input from the user. Now as the control is passed from one dialog to another we need a way to know the state of the conversation that is currently in progress. Also we may need to store the user information so that our responses can be based on what we know about the user.
There are two different states maintained
- Conversation State
- User State
Conversation state help your bot keep track of the current conversation the bot is having with the user. If your bot needs to complete a sequence of steps or switch between conversation topics, you can use conversation properties to manage steps in a sequence or track the current topic.
User state can be used for many purposes, such as determining where the user’s prior conversation left off or simply greeting a returning user by name. If you store a user’s preferences, you can use that information to customize the conversation the next time you chat. For example, you might alert the user to a news article about a topic that interests her, or alert a user when an appointment becomes available.
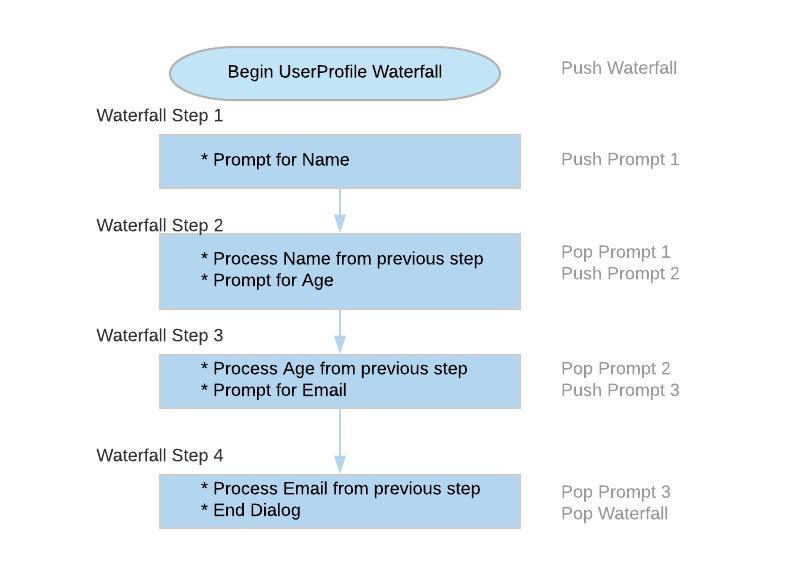
Waterfall Dialog
A waterfall dialog is a special kind of dialog. Its basically a sequence of steps wherein each step we would prompt the user by sending an activity and also process the data requested in the previous step. A waterfall dialog is used mostly in cases where we need to gather input from a user.
For example, in the case of gathering user info , the UserProfileDialog would actually be a Waterfall Dialog. It would contain a sequence of steps as shown below :
How a conversation flow is processed
The bot processing is basically implemented by maintaining a callback stack. As the conversation progresses dialogs are added onto the stack and popped off the stack.
Let’s take the example of the user signup mentioned before,this involves collecting two different sets of information :
- User info - name, age , email
- Business info - business name, location, size
We can implement this by creating two waterfall dialogs , UserProfiledialog and BusinessInfoDialog. Above this there would be a parent waterfall dialog , say SignupDialog which would invoke the two dialogs.
The flow of control as each dialog is called to gather the required info can be visualized as shown below:
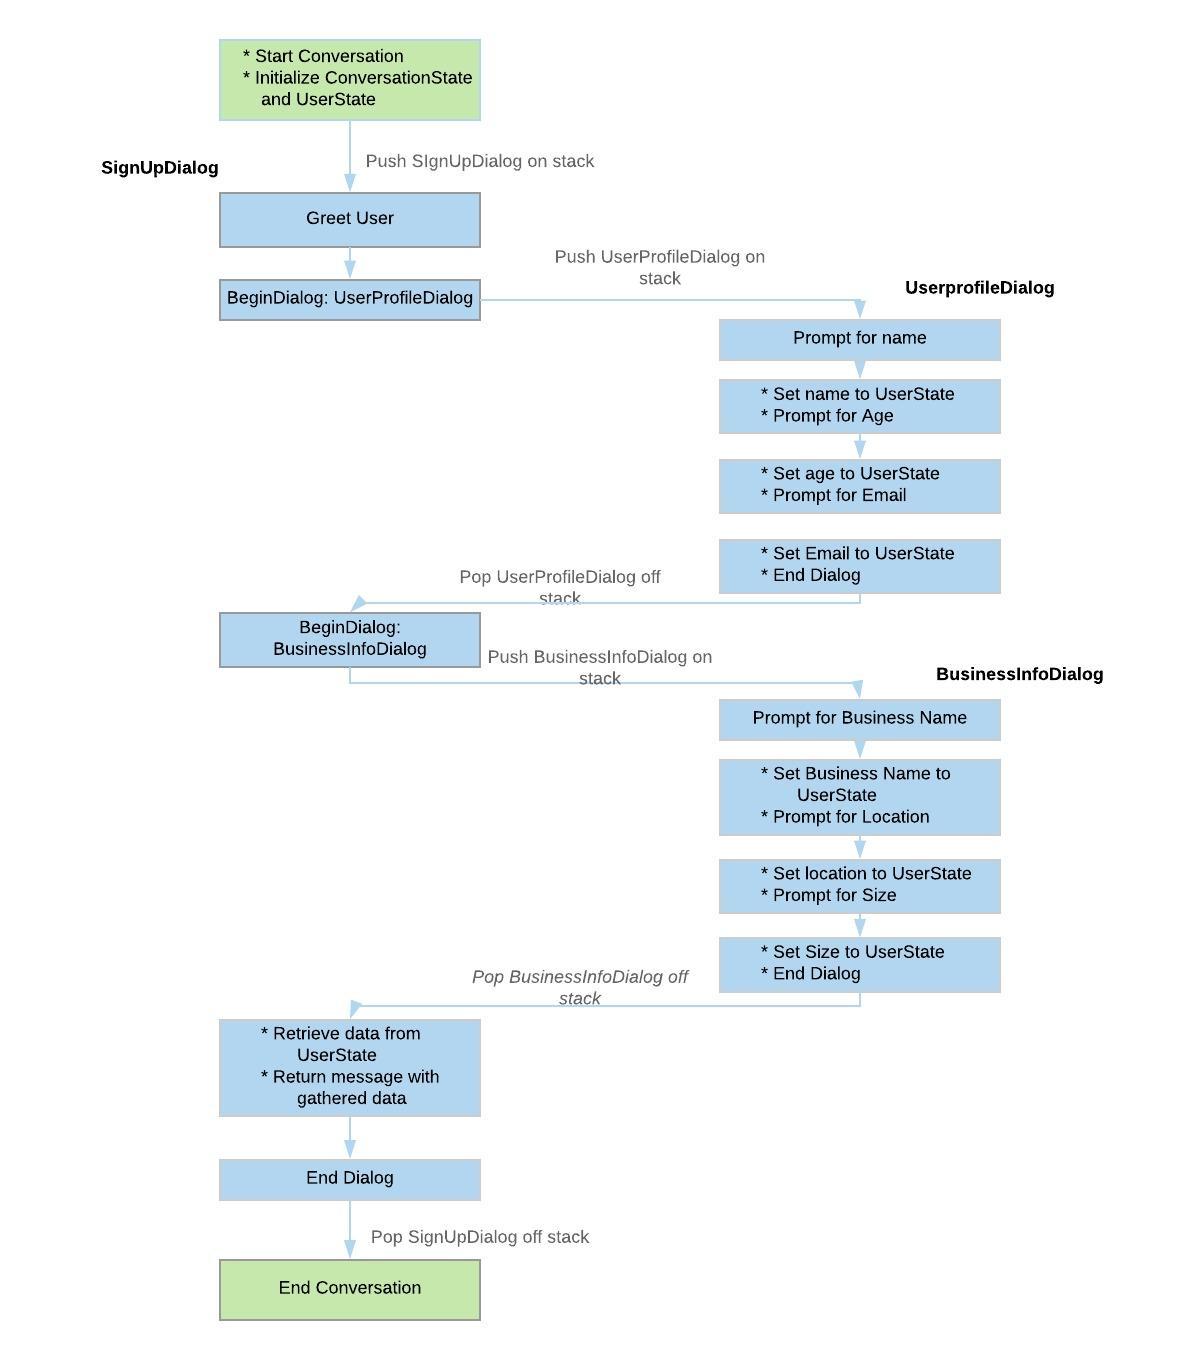
- As you can see in the image, the conversation starts by initializing the UserState and ConversationState objects.
- First the parent dialog SignUpDialog is begun by pushing it onto the stack. The waterfall steps in this dialog include calls to the UserProfileDialog and BusinessInfoDialog
- Each of these dialogs executes its steps in the waterfall, stores the gathered information in the UserState object and returns control back to the parent dialog
- As each dialog is begun they are pushed onto the call stack and popped off when the end dialog is called
- Finally, the SignUpDialog can read the gathered info from the UserState object and send it to the user as a message activity
Natural language processing
As I mentioned at the beginning, one of the use cases we had was to interpret the users input and take appropriate action. Basically we had to recognize what the user is trying to say. This functionality can be built into a bot with the help of a recognizer.
Recognizers are basically used for recognizing user’s intent from the input. In its simplest form a recognizer would be a simple Regex matcher, that would match the input against a regex string and take appropriate action.
However understanding user’s intent requires more than just a simple regex match recognizer. This is where Natural Language Processing (NLP) comes into the picture. Bot framework provides NLP support in the form of Microsoft LUIS (Language Understanding Intelligent Service).
LUIS is a separate API service of Azure that allows your application to understand what a person wants in their own words.
LUIS service is based on three main concepts:
- Intent - What the user wants to do
- Entities - Key words in the user input
- Utterances - input from the user
For example , suppose the user wants to view his/her campaigns performance for a certain period, he/she may request this by the following utterances for example:
- “Campaign Performance for last 30 days”
- “How did my campaigns perform in the last 2 months”
The intent here is Campaigns performance.
There is only one Entity, the time period for which the the performance data has to be fetched. Entities are basically the additional information that is required to satisfy the intent of the user.
Setting up LUIS involves specifying the different intents and corresponding utterances and entities for each intent. This is followed by training the model which is basically feeding a simple set of utterances so that the LUIS app can improve its Natural Language understanding.
We can integrate LUIS into our bot by defining a LUISRecognizer, a plugin that communicates with the LUIS API. On receiving a message activity, the user input is fed to the recognizer which in turn communicates to LUIS API. LUIS processes the input and returns data specifying the intent and the entities.
Integrating the bot into a web app
A bot created using bot framework SDK is basically an application running on a server that exposes an endpoint to send and receive messages. Therefore there are two ways of hosting a bot service:
- As a web app bot , either on azure (as an App service) or on any custom server
- As a serverless azure function
This means that the bot need not be hosted on azure, we can simply run it on our own server. However to use the bot in a channel like like Skype, Slack , web site etc. we have to register it on Azure.
A channel is a connection between the bot and communication apps.
The different channels supported are Skype, slack, web chat channel etc.. Channels like Skype, slack, web chat etc.. are considered as standard channels. The communication between the bot and these channels are provided by the Bot Connector Service. However, to connect the bot to our own client application requires the use of Direct Line Connection.
To integrate the bot into our own web app , there are two options :
- Embed a standard web chat channel
- Configure a Direct Line Channel
Embed a standard web chat channel
A web chat channel is one of the standard channels. One a bot is registered on Azure, we can get obtain a secret key and an embed code as shown:
<iframe src='https://webchat.botframework.com/embed/ROIMatic?s=YOUR_SECRET_HERE'></iframe>
Simply add the iframe code in your web app page and update the secret key obtained from azure. The web chat interface will be rendered into the iframe. In this case it is possible to customize the look and feel of the web chat by overriding the classes within the iframe.
This approach is easy in the sense that it can be viewed as simply placing a web chat window at a particular position on the web page. The downside to this approach is that the transfer of activities to and from the bot are not under the control of the client application (web app).
Configure a Direct Line channel
This way of integration allows the client application (web app) to communicate with the bot on its own completely invisible to users (i.e., other than receiving messages and sending messages typed into the chat window). This type of integration is provided by the open source web chat control. This is based on ReactJS and uses the Direct Line API to communicate with the bot.
To use this, first we need to obtain a Direct Line secret key from azure. Then download the open source web chat control sdk from here. Running npm build on this generates a js and a css file. botChat.js and botChat.css.
To integrate it into your web app you can add references to the two files in your app, and configure Direct Line in code as follows :
<html>
  <head>
    <meta charset="utf-8">
    <title>ROIMatic</title>
  </head>
  <body class="page-body">
    <div id="bot"></div>
  </body>
</html>
<script type="text/javascript" src="public/src/js/botchat.js"></script>
<script>
  var botConnection = new BotChat.DirectLine({
        secret: "<direct_line_secret>",
      });
  BotChat.App({
    botConnection: botConnection,
    user: user,
    bot: { id: 'botid' },
    resize: 'detect'
  }, document.getElementById("bot"));

</script>
As I mentioned, in this approach we can receive and send activities using the Direct line API. for eg, to send an event activity
botConnection
.postActivity({
    from: user,
    name: 'requestWelcomeDialog',
    type: 'event',
    value: ''
})
.subscribe(function (id) {
    console.log('"trigger requestWelcomeDialog" sent');
});
Conclusion
So looking back the entire process of identifying a bot framework and understanding how a bot works was very interesting and a great opportunity to explore. This is just a brief idea of some of the basic concepts involved in building a bot, there is lots more to it. Another aspect which I didn’t elaborate more on was supporting speech input. The prospect of combining speech input with LUIS means that we would be able to build an interface where a user can communicate with the web app similar to using amazon’s ‘Alexa’.